つれづれなる備忘録

日々の発見をあるがままに綴る

Texによる文書作成25 ~TikZ-FeynHand 4

 ファインマンダイアグラムをLaTeXで表記するTikz-Feynhandの使い方の締めくくりとして、いくつかのファインマンダイアグラムの描画例を紹介する。

atatat.hatenablog.com

以下のファインマンダイアグラム一覧からピックアップする

ja.wikipedia.org

1. 泡(バブル)ダイアグラム

円を描くのに円弧を組み合わせてlooseness=1.5とした。

\begin{figure}[htpb]
\centering
\begin{tikzpicture}
\begin{feynhand}
\vertex (a) at (0,0); \vertex (b) at (1,0);
\vertex (c) at (2,0); 
\vertex (d) at (0,1);\vertex (e) at (0,-1);
\propag[fer] (a) to (d);\propag[fer] (e) to (a);
\propag[photon] (a) to (b);
\propag[fer] (b) to [in=90, out=90, looseness=1.5] (c);
\propag[plain] (b) to [in=270, out=270, looseness=1.5] (c);
\end{feynhand}
\end{tikzpicture}
\caption{バブルダイアグラム}
\end{figure} 
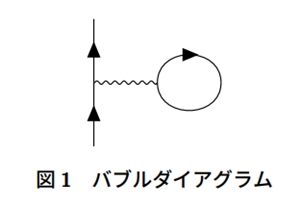
"バブルダイアグラム"
バブルダイアグラム

2. 対生成・対消滅

直線のみのダイアグラムなのであまり難しいところはない。

\begin{figure}[htpb]
\centering
\begin{tikzpicture}
\begin{feynhand}
\vertex (a) at (0,0); \vertex[particle] (b) at (-1,-1.5){$e^{-}$};
\vertex[particle] (c) at (-1,1.5){$e^{+}$};
\propag[fer] (b) to (a);\propag[fer] (a) to (c);
\vertex (d) at (1.5,0);
\propag[photon] (a) to [edge label=$\gamma$] (d);
\vertex[particle] (e) at (2.5,1.5){$e^{+}$};\vertex[particle] (f) at (2.5,-1.5){$e^{-}$};
\propag[fer] (d) to (e);\propag[fer] (f) to (d);
\end{feynhand}
\end{tikzpicture}
\caption{対生成}
\end{figure} 

"対生成"
対生成

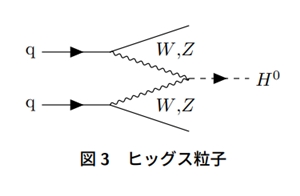
3.ヒッグス粒子生成

これも直線だけなのであまり難しいところはないが、ラベルでカンマを表示するために$W{,}Z$としているところがポイントになる。

\begin{figure}[htpb]
\centering
\begin{tikzpicture}
\begin{feynhand}
\vertex[particle] (a) at (0,0) {q}; \vertex (b) at (1.5,0); \vertex (c) at (3,0.5) ;
\vertex (d) at (3,-0.5); \vertex[particle] (e) at (4.5,-0.5) {$H^{0}$};
\vertex[particle] (a1) at (0,-1) {q}; \vertex (b1) at (1.5,-1); \vertex (c1) at (3,-1.5) ;
\propag[fer] (a) to (b);\propag[fer] (a1) to (b1);
\propag[plain] (b) to (c);\propag[plain] (b1) to (c1);
\propag[pho] (b) to [edge label=$W {,} Z$]  (d);
\propag[pho] (b1) to [edge label'=$W {,} Z$]  (d);
\propag[chasca] (d) to (e);
\end{feynhand}
\end{tikzpicture}
\caption{ヒッグス粒子}
\end{figure} 

"ヒッグス粒子"
ヒッグス粒子

4. ペンギンダイアグラム

 曲線のところはlosenessをいろいろ調整して描画した。

\begin{figure}[htpb]
\centering
\begin{tikzpicture}
\begin{feynhand}
\vertex (a) at (0,-2);\vertex[dot] (b) at (1,0){};\vertex[dot] (c) at (2,0) {};\vertex (d) at (3,-2);
\vertex[dot] (e) at (1.5,-2) {};
\vertex[dot] (f) at (1.5,-2.5) {};
\vertex (g) at (0.5,-3);\vertex (h) at (2.5,-3);
\propag[fer] (a) to [edge label=$b$] (b);\propag[fer] (c) to [edge label=$s$] (d);
\propag[bos] (b) to [edge label=$W$] (c);
\propag[fer] (b) to [quarter right,looseness=0.5,edge label=$t$] (e);
\propag[fer] (c) to [quarter left,looseness=0.5,edge label'=$t$] (e);
\propag[bos] (e) to (f);
\propag[fer] (g) to (f);\propag[fer] (f) to (h);
\end{feynhand}
\end{tikzpicture}
\caption{ペンギンダイアグラム}
\end{figure} 
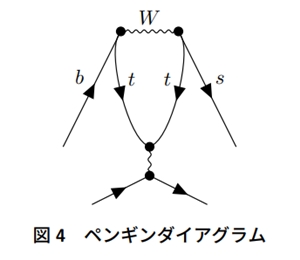
"ペンギンダイアグラム"
ペンギンダイアグラム

5. まとめ

 今回はTikz-Feynhandを用いたファインマンダイアグラムの描画例について紹介した。
Texによる文書作成24 ~TikZ-FeynHand 3

 ファインマンダイアグラムをLaTeXで表記するパッケージとしてTikz-Feynhandの使い方について前回に引き続き紹介する。

atatat.hatenablog.com

1. propagatorの変形

 前回はvertex同士を結ぶpropagatorの種類を指定したが、今回は直線を変形して円弧にする方法を紹介する。直線を変形するにはpropagのオプションでvertexに接続する角度を指定する。 例えば上向きの円弧であれば角度をそれぞれ90度に指定するため\propag[fer] (a) to [in=90, out=90] (b);とする。また下向きの円弧では角度を270度とするため\propag[fer] (a) to [in=90, out=90] (b);とする。 円弧の曲がり方はlosenessで指定する。

\begin{figure}[htpb]
\centering
\begin{tikzpicture}
\begin{feynhand}
\vertex (a) at (0,0); \vertex (b) at (2,0);
\vertex (a1) at (0,-1); \vertex (b1) at (2,-1);
\vertex (a2) at (0,-2); \vertex (b2) at (2,-2);
\vertex (a3) at (0,-3); \vertex (b3) at (2,-3);
\propag[fer] (a) to [in=90, out=90] (b);
\propag[fer] (a1) to [in=90, out=90, looseness=1] (b1);
\propag[fer] (a2) to [in=90, out=90, looseness=1.5] (b2);
\propag[fer] (a3) to [in=270, out=270] (b3);
\end{feynhand}
\end{tikzpicture}
\caption{円弧}
\end{figure} 

実行すると以下のようになる。

"円弧の描画"
円弧の描画

in/outを角度で指定するほかに、キーで指定することができる。上向きの円弧であればhalf left または quarter left、下向きであればhalf right または quarter rightとするとin=90,out=90またはin=270,out=270のオプションと等価になる。曲がり方はlosenessで指定することができる。

\begin{figure}[htpb]
\centering
\begin{tikzpicture}
\begin{feynhand}
\vertex (a) at (0,0); \vertex (b) at (2,0);
\vertex (a1) at (0,-1); \vertex (b1) at (2,-1);
\vertex (a2) at (0,-2); \vertex (b2) at (2,-2);
\vertex (a3) at (0,-3); \vertex (b3) at (2,-3);
\vertex (a4) at (0,-4); \vertex (b4) at (2,-4);
\propag[fer] (a) to [half left] (b);
\propag[fer] (a1) to [half left, looseness=1.5] (b1);
\propag[fer] (a2) to [quarter left] (b2);
\propag[fer] (a3) to [half right] (b3);
\propag[fer] (a4) to [quarter right] (b4);
\end{feynhand}
\end{tikzpicture}
\caption{円弧,キー指定}
\end{figure} 

"円弧の描画(キー指定)"
円弧の描画(キー指定)

inとoutの角度指定により円弧以外に直線を変形することもできる。

\begin{figure}[htpb]
\centering
\begin{tikzpicture}
\begin{feynhand}
\vertex (a) at (0,0); \vertex (b) at (2,1);
\propag[glu] (a) to [out=0, in=180] (b);
\vertex (a1) at (0,-1); \vertex (b1) at (2,-2);
\propag[bos] (a1) to [out=0, in=90] (b1);
\end{feynhand}
\end{tikzpicture}
\caption{その他変形}
\end{figure} 

"その他の変形"
その他の変形

2. ラベルと着色

 propagatorによる線の上にラベルを表示するには\porpagのオプションで[edge label = $k$]とする。ラベル名は$ $で囲うとpropagatorの上にラベル名を表示できる。また[edge label' = $k$]とするとラベル位置をpropagatorの反対側にすることができる。propagatorの色は\propag [fer,orange]とすることで指定できる。 なお公式マニュアルhttps://arxiv.org/abs/1802.00689 には\propag [fer,Orange]など最初が大文字で記載されているが、実行するとエラーになる。tikzの公式マニュアル8ページ目,3.6 Colorsに正しいカラーコードの記載がある。http://cremeronline.com/LaTeX/minimaltikz.pdf

\begin{figure}[htpb]
\centering
\begin{tikzpicture}
\begin{feynhand}
\vertex (a1) at (0,0); \vertex (a2) at (1,1.5);
\vertex (b1) at (1.5,1.5); \vertex (b2) at (2.5,0);
\propag [fer,orange] (a1) to [edge label = $k$] (a2);
\propag [fer,blue] (b1) to [edge label'= $p'$] (b2);
\end{feynhand}
\end{tikzpicture}
\caption{ラベルと着色}
\end{figure} 

"ラベルと色指定"
ラベルと色指定

 次にpropagatorが重なった場合、上層に表示するpropagatorはオプションでtopを指定するとともに最後に描画するようにする。下層のpropagatorはwith arrow=0.25とすることで矢印の位置が上層のpropagatorと重ならないように退避させる。

\begin{figure}[htpb]
\centering
\begin{tikzpicture}
\begin{feynhand}
\vertex (a) at (0,0); \vertex (b) at (2,1);
\vertex (c) at (0,1); \vertex (d) at (2,0);
\propag [fer, blue,with arrow=0.25] (a) to (b);
\propag [chabos, orange,top] (c) to (d);
\end{feynhand}
\end{tikzpicture}
\caption{着色と重なり}
\end{figure} 

"着色と重なり"
着色と重なり

3. まとめ

 今回はpropagatorの変形、ラベル、着色、重なりなどの処理について紹介した。

Texによる文書作成23 ~TikZ-FeynHand 2

 ファインマンダイアグラムをLaTeXで表記するパッケージとしてTikz-Feynhandの使い方について前回に引き続き紹介する。

atatat.hatenablog.com

1. Vertexの変更

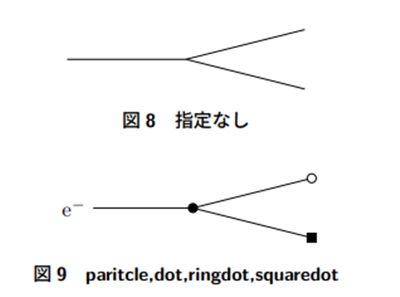
 まずVetexのオプションについて紹介する。コマンド\vertex[]で[]内にオプションを記述することで頂点の表示を変更することができる。 前回紹介したようにparticleを指定する場合は\vertex[particle] (a) at (0,0) {name of particle}として表示する粒子名を記述する。

%頂点を指定しない場合
\begin{figure}[htpb]
\centering
\begin{tikzpicture}
\begin{feynhand}
\vertex (a) at (0,0); \vertex (b) at (2,0);
\vertex (c1) at (4,0.5); \vertex (c2) at (4,-0.5);
\propag [plain] (a) to (b);
\propag [plain] (b) to (c1);
\propag [plain] (b) to (c2);
\end{feynhand}
\end{tikzpicture}
\caption{指定なし}
\end{figure}

%頂点のオプションを指定した場合
\begin{figure}[htpb]
\centering
\begin{tikzpicture}
\begin{feynhand}
\vertex[particle] (a) at (0,0) {e$^-$}; \vertex[dot] (b) at (2,0){};
\vertex[ringdot] (c1) at (4,0.5){}; \vertex[squaredot] (c2) at (4,-0.5){};
\propag [plain] (a) to (b);
\propag [plain] (b) to (c1);
\propag [plain] (b) to (c2);
\end{feynhand}
\end{tikzpicture}
\caption{paritcle,dot,ringdot,squaredot}
\end{figure} 

実行結果は以下のように頂点の表示がオプションにより変更されていることがわかる。

"vertexコマンドのオプション1"
vertexコマンドのオプション1

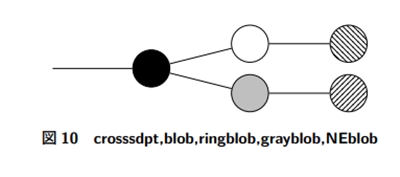
dot,ringdot,squaredotのほかにはcrossdotやblob系のオプションがある。

\begin{figure}[htpb]
\centering
\begin{tikzpicture}
\begin{feynhand}
\vertex[crossdot] (a) at (0,0); \vertex[blob] (b) at (2,0){};
\vertex[ringblob] (c1) at (4,0.5){}; \vertex[grayblob] (c2) at (4,-0.5){};
\vertex[NWblob] (d1) at (6,0.5){};\vertex[NEblob] (d2) at (6,-0.5){};
\propag [plain] (a) to (b);
\propag [plain] (b) to (c1);
\propag [plain] (b) to (c2);
\propag [plain] (c1) to (d1);
\propag [plain] (c2) to (d2);
\end{feynhand}
\end{tikzpicture}
\caption{crosssdpt,blob,ringblob,grayblob,NEblob}
\end{figure} 

実行結果は以下のようになる。

"vertexコマンドのオプション2"
vertexコマンドのオプション2

2. Propagatorの変更

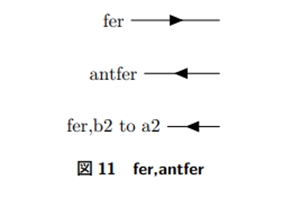
 Vertexと同様にPropagatorのオプション設定をplain以外を指定することで表示を変更することができる。

\begin{figure}[htpb]
\centering
\begin{tikzpicture}
\begin{feynhand}
\vertex[particle] (a) at (0,0) {fer}; \vertex (b) at (2,0);
\vertex[particle] (a1) at (0,-1){antfer}; \vertex (b1) at (2,-1);
\vertex[particle] (a2) at (0,-2){fer,b2 to a2}; \vertex (b2) at (2,-2);
\propag[fer] (a) to (b);
\propag[antfer] (a1) to (b1);
\propag[fer] (b2) to (a2);
\end{feynhand}
\end{tikzpicture}
\caption{fer,antfer}
\end{figure} 

ferを指定すると矢印が追加される。矢印の方向を逆にするにはantferを指定するか、propagatorの頂点指定の順序を逆にしても同じ効果になる。(線の意味合いが異なるので、antferを指定した方がよさそう) 実行結果は以下のようになる。

"propagatorのオプション1"
propagatorのオプション1

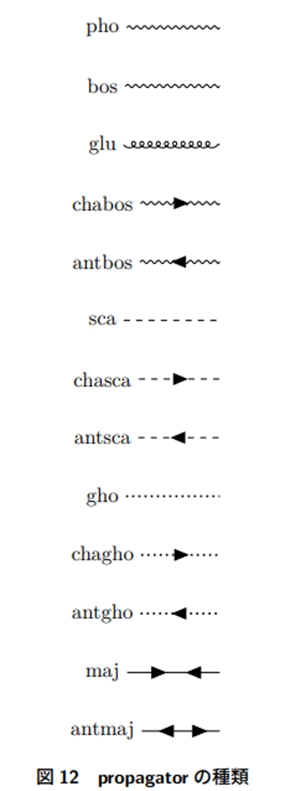
フォトン・ボソン、グルーオンなどを表す線種に変更することもできる。

\begin{figure}[htpb]
\centering
\begin{tikzpicture}
\begin{feynhand}
\vertex[particle] (a) at (0,0) {pho}; \vertex (b) at (2,0);
\vertex[particle] (a1) at (0,-1){bos}; \vertex (b1) at (2,-1);
\vertex[particle] (a2) at (0,-2){glu}; \vertex (b2) at (2,-2);
\vertex[particle] (a3) at (0,-3){chabos}; \vertex (b3) at (2,-3);
\vertex[particle] (a4) at (0,-4){antbos}; \vertex (b4) at (2,-4);
\vertex[particle] (a5) at (0,-5){sca}; \vertex (b5) at (2,-5);
\vertex[particle] (a6) at (0,-6){chasca}; \vertex (b6) at (2,-6);
\vertex[particle] (a7) at (0,-7){antsca}; \vertex (b7) at (2,-7);
\vertex[particle] (a8) at (0,-8){gho}; \vertex (b8) at (2,-8);
\vertex[particle] (a9) at (0,-9){chagho}; \vertex (b9) at (2,-9);
\vertex[particle] (a10) at (0,-10){antgho}; \vertex (b10) at (2,-10);
\vertex[particle] (a11) at (0,-11){maj}; \vertex (b11) at (2,-11);
\vertex[particle] (a12) at (0,-12){antmaj}; \vertex (b12) at (2,-12);
\propag[pho] (a) to (b);
\propag[bos] (a1) to (b1);
\propag[glu] (a2) to (b2);
\propag[chabos] (a3) to (b3);
\propag[antbos] (a4) to (b4);
\propag[sca] (a5) to (b5);
\propag[chasca] (a6) to (b6);
\propag[antsca] (a7) to (b7);
\propag[gho] (a8) to (b8);
\propag[chagho] (a9) to (b9);
\propag[antgho] (a10) to (b10);
\propag[maj] (a11) to (b11);
\propag[antmaj] (a12) to (b12);
\end{feynhand}
\end{tikzpicture}
\caption{propagatorの種類}
\end{figure} 

"propagatorのオプション2"
propagatorのオプション2

3. まとめ

 今回はVertexとPropagatorのオプション指定と表示の変更について取り上げた。少しコード量が多くなってしまったので、Propagatorの変形、ラベルなどに関して次回としたい。