Texによる文書作成25 ~TikZ-FeynHand 4
ファインマンダイアグラムをLaTeXで表記するTikz-Feynhandの使い方の締めくくりとして、いくつかのファインマンダイアグラムの描画例を紹介する。
以下のファインマンダイアグラム一覧からピックアップする
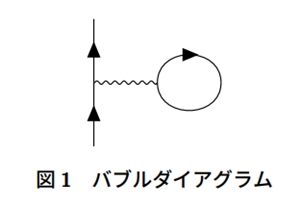
1. 泡(バブル)ダイアグラム
円を描くのに円弧を組み合わせてlooseness=1.5とした。
\begin{figure}[htpb]
\centering
\begin{tikzpicture}
\begin{feynhand}
\vertex (a) at (0,0); \vertex (b) at (1,0);
\vertex (c) at (2,0);
\vertex (d) at (0,1);\vertex (e) at (0,-1);
\propag[fer] (a) to (d);\propag[fer] (e) to (a);
\propag[photon] (a) to (b);
\propag[fer] (b) to [in=90, out=90, looseness=1.5] (c);
\propag[plain] (b) to [in=270, out=270, looseness=1.5] (c);
\end{feynhand}
\end{tikzpicture}
\caption{バブルダイアグラム}
\end{figure}
2. 対生成・対消滅
直線のみのダイアグラムなのであまり難しいところはない。
\begin{figure}[htpb]
\centering
\begin{tikzpicture}
\begin{feynhand}
\vertex (a) at (0,0); \vertex[particle] (b) at (-1,-1.5){$e^{-}$};
\vertex[particle] (c) at (-1,1.5){$e^{+}$};
\propag[fer] (b) to (a);\propag[fer] (a) to (c);
\vertex (d) at (1.5,0);
\propag[photon] (a) to [edge label=$\gamma$] (d);
\vertex[particle] (e) at (2.5,1.5){$e^{+}$};\vertex[particle] (f) at (2.5,-1.5){$e^{-}$};
\propag[fer] (d) to (e);\propag[fer] (f) to (d);
\end{feynhand}
\end{tikzpicture}
\caption{対生成}
\end{figure}

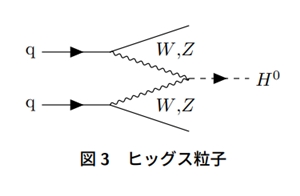
3.ヒッグス粒子生成
これも直線だけなのであまり難しいところはないが、ラベルでカンマを表示するために$W{,}Z$としているところがポイントになる。
\begin{figure}[htpb]
\centering
\begin{tikzpicture}
\begin{feynhand}
\vertex[particle] (a) at (0,0) {q}; \vertex (b) at (1.5,0); \vertex (c) at (3,0.5) ;
\vertex (d) at (3,-0.5); \vertex[particle] (e) at (4.5,-0.5) {$H^{0}$};
\vertex[particle] (a1) at (0,-1) {q}; \vertex (b1) at (1.5,-1); \vertex (c1) at (3,-1.5) ;
\propag[fer] (a) to (b);\propag[fer] (a1) to (b1);
\propag[plain] (b) to (c);\propag[plain] (b1) to (c1);
\propag[pho] (b) to [edge label=$W {,} Z$]  (d);
\propag[pho] (b1) to [edge label'=$W {,} Z$]  (d);
\propag[chasca] (d) to (e);
\end{feynhand}
\end{tikzpicture}
\caption{ヒッグス粒子}
\end{figure}
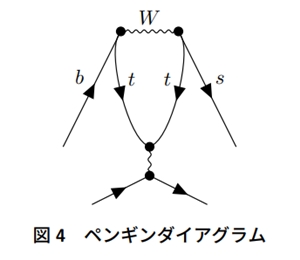
4. ペンギンダイアグラム
曲線のところはlosenessをいろいろ調整して描画した。
\begin{figure}[htpb]
\centering
\begin{tikzpicture}
\begin{feynhand}
\vertex (a) at (0,-2);\vertex[dot] (b) at (1,0){};\vertex[dot] (c) at (2,0) {};\vertex (d) at (3,-2);
\vertex[dot] (e) at (1.5,-2) {};
\vertex[dot] (f) at (1.5,-2.5) {};
\vertex (g) at (0.5,-3);\vertex (h) at (2.5,-3);
\propag[fer] (a) to [edge label=$b$] (b);\propag[fer] (c) to [edge label=$s$] (d);
\propag[bos] (b) to [edge label=$W$] (c);
\propag[fer] (b) to [quarter right,looseness=0.5,edge label=$t$] (e);
\propag[fer] (c) to [quarter left,looseness=0.5,edge label'=$t$] (e);
\propag[bos] (e) to (f);
\propag[fer] (g) to (f);\propag[fer] (f) to (h);
\end{feynhand}
\end{tikzpicture}
\caption{ペンギンダイアグラム}
\end{figure}
5. まとめ
今回はTikz-Feynhandを用いたファインマンダイアグラムの描画例について紹介した。